Saturday, October 20, 2012

the revolution

there is a revolution happening

Lightweight and Ultralight backpacking are real, and it can change the way you appreciate the Wilderness.
______________________________________________________

Thursday, October 18, 2012

ease of travel


 Tidy little video with an empahsis on the philosophical grroviness of utraight travel.
_______________________________________________________

Saturday, September 1, 2012

Liberate yourself from Toilet paper

 click on any image for a hi-rez view


TIP number 116 

I’m always disapointed when my camping team-mates walk into the woods for a dump run, and they bring along their toilet paper. Good grief, what kind of Wilderness experience is that? Mankind has been pooping in the woods since we climbed down out of the trees, and toilet paper (TP) is a pretty recent invention when you look at human history.

We live in a society with user-friendly toilets and they all come equipped with a wonderful roll of TP. There’s nothing for us to think about, we do our duty, wipe and flush. We’ve created a very nice convenience, but it’s separated us from what should be a very simple bit of outdoor know-how.

Why are so many campers so dependent on toilet paper? I would have to guess that they’ve never in their life used anything other than the store bought stuff on a roll. Or, they’ve had a bad experience with their one-and-only time with natural wiping material. It’s a sad truth, Natural Butt-Wiping is a lost art.

Too many people bury their used TP, or worse, they just leave it on the surface. We don’t have to deal with it in the bathroom, we simply flush. Sadly, this transfers to not dealing in the backcountry too. It’s left as trash out of an inability to deal.

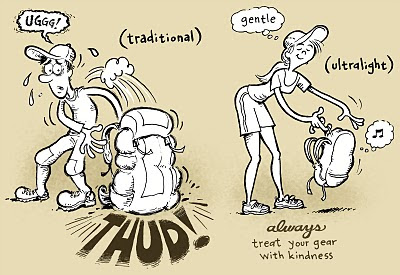
The ultralight benefits? Not having TP obviously saves 100% of its weight. But beyond that, you are liberated from something that we think we need.

Over the decades, I have found an awful lot of used toilet paper in the mountains and it’s disgusting. (see tip <<< 44 > Practice Leave No Trace camping >>>) My heart sinks every time. And please know, I actually do something about it, I clean it up. Finding used toilet paper leaves me absolutely disgusted at all of humanity. I deal with these piles of white (and brown) toilet paper, I’ll either burn it or carry it out, and I don’t shy away from this thankless chore. Am I a weirdo zealot about not using toilet paper? Sure enough, but it wells up from dealing with other people’s laziness.

If you do choose to bring store bought toilet paper, I feel strongly that it must be carried out and not just left in the backcountry (for me to find). Triple bag it before it goes back in your pack. Burning is not recommended because this is an all too common cause of forest fires.


What to use?
Please know, the backcountry is home to a plentitude of wonderful wiping things. Any camper who wants to make fun of natural TP will immediately sneer and mention pinecones. Yes, just the image of a pinecone with all those pointy things makes my butt wince. With very few exceptions, pinecones do NOT work! But, if you find a batch from a Douglas Fir, you got the goods!

Snow
If you have snow available, you will have a stupendously clean bunghole! No foolin’ - snow has all the properties that make it the crème de la crème of natural butt wiping. Don’t use gloves, use you bare hand and make a snowball by squeezing. Don’t make round snowball shape, you want to create a pointy feature for the business end. Snow is the perfect combo of smooth and abrasive, it’s just wet enough for a little extra cleaning power, and it’s white! The whiteness will allow the wiper to accurately monitor any residue in the area in question. Plus, if you have snow, you usually have a LOT of it.

Here’s an insight into my personal wiping habits: I use a LOT of wiping material. I am never satisfied until I know that things are super-duper-clean. I encourage you to strive for the same high standards.


River rocks
Smooth and elegant, these polished beauties are the second best behind snow. Before visiting your private zone, collect a load of these rocks. Not to big, not too small, a little flat, a little pointy and definitely NOT round. Once again, grab a lot of ‘em.

Leaves
For the most part, leaves don’t work, they can be thin and easily torn. If you do use little leaves, use a small stack of them so your finger tip doesn’t poke through at the wrong moment. I’ve had better luck using the back side of leaves, where the raised veins can act as little scrubbers.

Please know, not all leaves are below par. Most of the Northern hemisphere has been graced with a gangly weed called Mullein (Verbascum thapsus), and a very similar plant called Wooly Lambs Ear (Stachys byzantina). These are both rather homely plants, but the leaves are like the wings of an angel. They are big, thick, strong, fuzzy and satisfying. These are pretty common, and they grow in clumps. If you are collecting these leaves, please carefully get them from a multiple plants, taking just a few leaves from each. Do not strip one of these cute fuzzy plants of all their leaves just to guarantee yourself a tidy butt. You don’t need to kill anything for hygiene!

Smooth sticks

A downed tree with dry weathered branches can be wonderful. Look for a collection of sticks about an inch in diameter, with minimal poking protuberances. Pick the smoothest side for wiping, taking advantage of the long featureless length of the stick.

Wooly lambs Ear

There is a fuzzy plant that is like being caressed by an angel. Also called Mulen.

Old Man’s Beard
Have you ever marveled at that weird electric yellow moss that hangs from the pine trees? This stuff is great. Once again, grab a little bit from multiple trees.


Grass
A goodly clump of grass makes for a pretty good cleaning tool. For a nice stiff set of bristles, you can fold the grass into a very tidy little brush. Grab the grass from a big zone, avoid stripping an area of all it’s green stuff.

Size required
For obvious reasons you'll want to keep your hands away from the contaminants that you’re trying to wipe away. So, whatever you use - make sure it’s big enough to keep your fingers a good distance from the working area.


The butt scuff on dewey tufts of grass
Sometimes you are in an environment with tufts of grass that look like little fright wigs. These will usually come in groups, and on a calm dewy morning, there is nothing more wonderful in the world. You can sit on one of these like a bicycle seat, and slide yourself along, letting the tuft do its scouring duty, if you find a row of these get ready to cry tears of joy. And if you have a little bit of downhill slope to work with, the job is a lot easier.

Plan ahead and prepare
Before the urge becomes a raging alarm, there are a few small things you’ll need to do. The act of collecting the wiping tools may take a little time and some searching. Start planning well before the need arises. Begin filling your pockets with nice smooth rocks, lots of ‘em (or leaves, sticks, etc). Keep an eye out for the perfect collection of broad leaf plants. Is it a short walk to a batch of snow still unmelted from last winter?

Do not - I repeat, DO NOT just squat down and expect to find the perfect wiping material within arms reach. It won’t be there, I know from experience. No need to describe this unpleasant dilemma.

The cat-hole
You will need to dig a shallow hole, and the UL tool of choice is a tent stake. The thin wire stakes won’t work, you’ll need at least one stake that is a little more stout. A trekking pole is a good tool too, just make sure to hold it low near the pointy end while digging. Other options are a sharp stick or a pointy rock.

The recommended technique espoused by Wilderness authorities says to take a trowel and dig a 6 to 8 inch deep hole. This is easy to draw (I know, I’ve drawn it in multiple books) but it can hard to actually do. There are a lot of places where the ground is too hard and it simply will not work, even with the best metal trowel. In some environments the soil is too rocky (or too dense) to get down that deep. If you can’t dig down deep enough, go wider, or create a shallow trench. No good answer here, my advice is to do the very best job you can do, whatever the circumstances.

The goal is to get the fecal matter to decompose in the organic soil near the surface. The micro-organisms will do their job and eventually change the dubious properties into something sterile, how long this might take is hard to say, but it will happen a lot faster in rich living top soil. It will happen exceedingly slow on the surface or under rocks. Please understand, there is the very real potential to contaminate water sources with human feces, so the simple act of properly burying your waist is a necessary undertaking.

After the bomb is dropped in the hole, take a little time to stir it up and mix it well with the organic soil. Yes, this basically means you get to play with your own poop. This important stirring process can dramatically accelerate the decomposition time. Please use a stick and not the tent stake.

At the end, refill the hole, and cover the ground in a way will disguise your job site. Take pride in this step, it’s a nice role to allow future visitors a pristine visual experience.

What to do with the used material?
After wiping you’ll need to dispose of the natural toilet paper. If you’ve dug a deep enough hole, depositing the wipers in there is a great solution. Re-fill the hole, and you’re done. But, sometimes you can only get the first few wipers in the hole because it’s too full (or barely deep enough) so you’ll have to toss the rest of ‘em. Carefully look around for a good place to deliver the contaminated post-wipe product. Avoid any spot a fellow camper may travel or step, and think about where water will run in the rain. Under a big bush is a good solution.


Hygiene

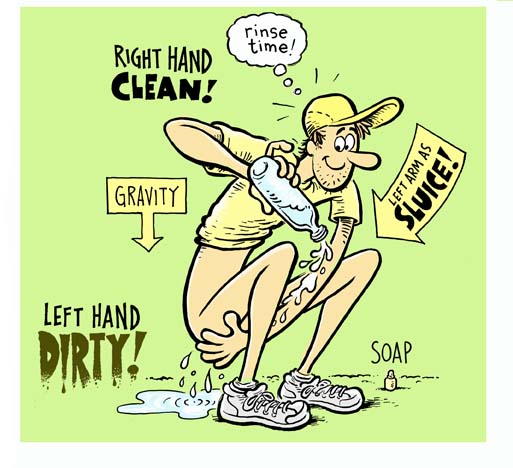
Wash your hands when you’re done, this is a vital part of the whole process. Don’t be a slob - fecal contamination is the cause of backcountry NVD! That’s Nausea, Vomiting & Diarrhea!

For the highest degree of success, employ your teammate as a helper. When you come back from your dump-run, tell ‘em that you’ll require their assistance. They can dig thru the pack (let them touch things with clean hands) getting the soap and a water bottle. They put the soap in your hands and they pour the water. Your contaminated hands touch nothing.

Hygiene tools
I always carry soap and alcohol hand sanitizing gel, both repackaged in tiny dropper bottles. These are essential safety components in my backcountry kit of dinky things. For soap, I am a devote of Dr. Bronner’s, and Almond is my favorite.

Time required
The humble act of pooping in the woods involves a goodly amount of busy work. You need to collect the wiping material, find a private spot, dig a cat-hole, fill it, wipe effectively, stir the poop, fill the hole back in, disguise the little area and wash your hands. Plus, you need to do a good job on each of these important steps.

If your partner says it’s dump time and then comes back after just a minute, do NOT let ‘em put their hand in your bag of gorp! To do a good job requires at least 10 minutes.

Thursday, July 26, 2012

Monday, July 23, 2012

treating water using a tiny MIX bottle (video)


This is an advanced technique, so it requires a long and detailed video.

For more info, read tip number 106, How I treat AQUAMIRA. I advocate a system that doesn't quite match what is recommended on the packaging. The advantage is a profound time savings and an increased efficiency on the trail.

3cc plastic bottle, wheighs 2 grams

I am constantly asked where I get those little bottles.

My reply, I get 'em HERE.

You can purchase these dinky little bottles on-line. If you do make an order, get more than you think you’ll need because the shipping will cost more than the bottles. Your camping pals will be envious, and at 21 cents each, you can happily give them away.

Monday, July 16, 2012

nice review

Somebody goin' by the name B.A. just added a really nice review to the Amazon page.

Just get it. Worth every penny.
I wanted to get back into backpacking again but a low back problem was keeping from carrying the weight of my old gear. The information in this book (and Ladigan's book "Lighten Up!") changed my mindset about gear and pack weight entirely.
My friend still carries about 45 lbs of gear for our weekend trips. When he lifted my pack during our last trip he said, "You've gotta be kiddin me!" I just smiled and told him to get the books.

That someone with a 45 pound pack sounds like a graduate of a certain outdoor school. If they had lifted that pack and said "No, this is impossible, I won't allow this into my brain," I would suspect that they're employed at an executive level at that same school.

Just so you know, a 45 pound backpack is considered remarkably light at that school.

___________________________________________

Thursday, July 12, 2012

the rain skirt

instructional illustration, click on art for a HI-rez view

_________________________________________

Audio instructions for making your own rain skirt. 
About 10 minutes long.
_________________________________________

RAIN SKIRT: 
This is an ridiculously easy thing to make yourself. Gravity goes straight down, so my legs get protected (mostly) from the falling rain by this very fashionable item. And plenty of breathability. This is a very easy make-it-yourself item, and the results are functional and stylish. I’ve made a series of these (and learned a lot from my nerdy R&D) and none weigh more than 2 oz!  The easiest way to create a lightweight pair of rain pants involves using Dri-Ducks, Frogg Toggs or TYVEC pants. These are all easy to find on-line and they're SUPER cheap!

Step 1:
Using scissors, cut the legs off at around knee height.

Step 2:
Cut the the entire inseam so that they are no longer pants - it's a skirt! The seams wont fray, so there is no need to sew anything. But (sometimes) I'll just use tiny little tabs of masking tape (yes, just that thin tan stuff) on the ends of each seam to keep the panels from separating.

The whole trimming and taping process should take less than 2 minutes. The weight should be UNDER 2 OUNCES! The rain skirt is dorky and laughably ugly, but it really works to keep your legs dry when hiking in the rain. The skirt is wonderfully breathable because it's open at the bottom. If I need to sit on soggy ground, I whip out my trust rain skirt for a little more comfort.

TYVEC pants:
These are as ugly as they are cheap (linked HERE). Somewhere around three bucks a pair. The shipping is more than the product so I will buy a handful, and I've been giving them out (as rain skirts). It's easier for me to hand someone something than to listen to them whine about how they can't get it together to do it themselves.

DRU-DUCKS and FROGG-TOGGS both make pretty much the exact same rain suit. So much so, that I think they ARE the same suit. Usually priced between $14 to $24 on-line.

The Jackets:
The rain jackets are the best think I've ever used. The weight should be right around, or slightly under, 7 ounces! These babies are amazingly breathable and fully waterproof. But they are ridiculously ugly and not very durable. I've patched my torn rain with plain ol' masking tape, and those repairs have lasted (just fine!) for over 6 years! I get an XXL size to fit over everything, I'm 6' 1" and I need the arm length.

My advice: Do not take this jacket to the jungles of Borneo and hike thru thorns! But, hike on trail and enjoy. Hike off-trail and be careful.

The Pants:
The ankles will shred if you walk off-trail for three steps. Better to turn these into a rain skirt.
________________________________________

BONUS! The rain skirt will leave you with the leftover leg part you cut off. These can be made into really tidy water proof stuff sacks! This involves tape and scissors, no sewing required.

Swanky super-model with a full ensemble of Dri-Ducks jacket and Rain-Skirt on a runway in Yellowstone, freshly adorned with hail!
__________________________________________


Monday, July 9, 2012

Walker's pure butter shortbread

integral to my Scottish heritage

These babies are a whopping 150 calories per ounce, so you carry something calorie dense with minimal volume in the pack. Only 4 ingredients; wheat flour, butter, sugar and salt. An ultralight backpackers dream food.
___________________________________________

Friday, June 22, 2012

an inspiring email from a reader named Brad

Big wilderness, little pack

Dear Mike, 

I've been bike touring, backpacking and climbing mountains for some time. And if you asked me a year ago about my technique/style I would have said that I was happy with how I was working and that everything was more or less wired. I have always been pragmatic and focused on avoiding unnecessary gear. 

Still, I was not a gram weenie by any measure. After reading your Ultralight Backpackin' Tips countless times [in and out of order] over the past year leading up to my recent JMT thru-hike my entire mindset has shifted. I have gone from being concerned to being mindful in terms of how I prepare and how I conduct myself in the backcountry. I really love how you avoid dogmatism and instead present ways of thinking through your "tips". 

While I found almost all of your tips to be helpful it was the mindset that informed them which really helped me turn a corner in my own practice. In some ways your book made me think of the Tyrol Declaration [maybe thats pushing it a little but I really did see the connection to the declarations assertion that style is substance]. 

I just returned from my 10 day thru-hike of the JMT which I started on June 2nd and the experience was unreal. My skin out weight was 27lbs with five days of food. Instead of evaluating how well my gear did or didn't perform I found that it simply did what it was meant to do and otherwise stayed out of my way. 

The simplicity of my techniques and gear allowed me to experience the high sierra with less stuff getting between me and the wilderness I had come to immerse myself in. For this I thank you. 

Best wishes, 
Brad 

Brooklyn, NY

_____________________________________________

Here was my reply:

Bradly,

Right on for you! You're reflecting back to me EXACTLY my goal when I wrote this little book. Huge thanks!

I went into the project thinking it was going to be a technical instructional on how to make your own gear, and modify existing gear (all that's in there). But, there really isn't that much gear to play with once you get right down to it. As I immersed myself in the writing process, the book morphed into something a lot more spiritual. Modifying the gear is easy, modifying the MIND-SET is challenging!

PLEASE - send me a few pictures - I wanna add this wonderful email to my blog!

peace from Idaho,
Mike C!
_____________________________________________

Wednesday, May 23, 2012

lightweight camping with Andrew Skurka

Andrew Skurka just posted an essay with photos about his inaugural 2012 trip into the Yosemite backcountry.

Linked HERE.

Just so you know, I'll be working with Andrew this summer as a guide, and there are still spots available for trips this summer. These are high quality intensive skills trips.

Want more info? Click HERE to secure a spot.

I can honestly recommend these outings, and Andrew's role as an instructor. Lightweight camping can be liberating and empowering, and the skills required are the focus of these trips.

Big Wilderness. Tiny backpack.

_________________________________________________

Thursday, May 10, 2012

interview with GoLite's president

Andrew Skurka just posted an excellent and informative interview with Coup at GoLite.  Linked HERE.

I've met Coup a bunch of times and I am continunally impressed with his bold ideas.
____________________________________________

Wednesday, April 18, 2012

The ideal sleeping spot

click on image for a HI-rez view

tip number 93

The traditional camper doesn’t need to worry about finding a nice flat spot to sleep. They just hike to a heavily impacted designated site that’s already pounded flat. Then (after they set up their tent) they just unroll their porky full length inflatable pad, fill a stuff sack with all the clothes they take off and use this as their pillow. Then they climb into their beefy sleeping bag. If there is something lumpy under them, no worries, they can pad it with extra gear in their tent, like their bulky pile vest.

The UL camper needs to think before sleeping.

I am 6 feet tall, and about 18 inches wide, so I need a flat spot that matches those specifications, and NOTHING more. That’s pretty easy to find even in the lumpiest parts of our planet. This means you are essentially able to sleep pretty much ANYWHERE. You are no longer burdened by the traditional needs of a porky tent. Please be aware, there are regulations in place in most popular camping areas, know these rules before you set out. Also, it is considered a courtesy to camp well away from trails, away from lakes and streams and out of other camper’s majestic views.

There is an uncomplicated methodology that can be employed to test flatness of any potential sleeping zone. Simply lie down in the desired spot, you’ll know right away if it’s lumpy or tilted. This is a foolproof technique and I advocate it emphatically. Alas, this overtly simple trick is unknown to most campers. If you are with partner, both of you should lie down side by side.

If you want a little extra comfort, find a spot with a very slight dip at your hips, so your tired butt can get cradled by the loving embrace of mother Earth.

And if you are using just a really thin pad, add a simple little doughnut made from closed-cell sleeping pad foam. This can be positioned under your hip bone if you are a side sleeper. Okay, you’ve picked your spot, tested it for flatness by lying down.

While you are still on the ground, fastidiously mark out the four corners of your rectangle with some sticks or rocks. This way you can still visualize it when you stand up, and you can erect your tarp to precisely cover that zone.

Tuesday, April 17, 2012

summer backpacking / guided education


Ultralight Superstar, Andrew Skurka

Just a heads up for folks, this summer I'll be teaching in the mountains for Andrew Skurka Guides. I'm honored to part of the team! I've worked with Andrew in the mountains he's the real deal! He's the driving force behind a set of guided trips throughout the lower-48 this summer and fall. There are two formats for 2012, a series of 3-day Ultimate Hiking Courses, and a set of more ambitious 7-day Wilderness Adventure Courses.

These trips will be run at a very high standard, focusing on very advanced skills and techniques of lightweight expeditioning.

There is a direct link to the site in the side-bar.

As it's set up right now, I'll be working in the Gros Ventre Range just east of Jackson Hole. There will be three separate 7-day trips, all running in July of 2012, the schedule is linked HERE.

There's a chance I'll be working a few other trips in 2012, but the details haven't been finalized. I'll keep you posted.

PLEASE NOTE:
I've been posting a lot about Andrew recently. That's because I've been reading his book and communicating with him about the upcoming guiding season.
_____________________________________________

Saturday, April 7, 2012

interview


There is an interview where I share stuff about the book at Backpacking-Light on-line magazine. I talk about the book as well as promote an upcoming Tip-of-the-Week on BackpackingLight.com. This book is a nice fit with the content of the web-site.


TIP number 5


Self portrait


It’s okay to be nerdy
I am living proof of this credo. I delight in the quirky problem solving required when wrestling with all the minutia of my pack-weight. I encourage you to dig deep and fully accept your inner nerd. It’s okay to obsess about a half an ounce, I encourage that attitude! I enjoy using my finely crafted do-it-yourself gear in the mountains.

Please know, I fully recognize how dorky all this can be, and I acknowledge that I fit every stereotype of the weirdo zealot. But it’s fun, and fun counts for a lot. I take great pride wearing my home-made rain skirt with a team of burly men!

TIP number 26


Care of the equipment

This is a skill, and like any other skill it can be developed and perfected. It’s no different than setting up a tarp on a windy conditions or reading a map, it is a skill.

I’ve had dubious traditional campers hold certain UL items in their hand and they’ll scoff (with venomous contempt) informing me that it’s simply too flimsy to stand up to the hellish rigors of camping in the mountains. That’s not true. There is a surprisingly simple technique I employ to maintain my gear and avoid unnecessary wear and tear, and it’s easily summed up in three words: I am careful.

The traditional camper has an arsenal of cordura, ballistic nylon and steel. No need to carefully set their pack down, they can just drop that formidable beast - and then sit on it! Not so with the UL gear.

Everything in the UL campers quiver is dainty, true enough. But, the perception is that the stuff is so flimsy that it’s unreliable, and some will even say unsafe! I am ever mindful of my gear and it’s limitations, and I make sure to treat it with loving kindness.

Also - I do NOT sit on my pack.


Wednesday, March 21, 2012

Andrew Skurka shares some of his accomplishments


National Geographic grantee Andrew Skurka gives a presentation about his record-setting, long-distance solo hikes. With stunning images and video, he guides us through his 4,700-mile, six-month trek around Alaska and the Yukon.

Tuesday, March 20, 2012

Review due soon

The OTHER book on ultralight backpackin' skills.

Please note, I plan on reviewing Andrew Skurka's new book. It'll be up soon, watch for it! Wanna see more? Click HERE!

This CAT FOOD STOVE image never made it to the book


I realized that this cartoon (above) never made it into the book. Drat! This cartoon shows a pot setting right on top of a simple cat food can stove. This is the most common way to use a cat food style stove and the way I recommend.

This illustration (above) is in the book on page 100. This is another technique to use a cat food stove. This set-up with the 3 tent-stakes (as a stove stand) is rarely used, but sometimes it helps improve the burning depending on any number of circumstances. It works, but not as well as the system shown in the top illustration. This was an oversight, I wish the book would have been published with both these pictures, with this lower image being labeled as another option. I realize this might seem confusing to the readers of my book.


Here's a video of UL Super-Star Andrew Skurka making a Fancy Feast Cat Food Can Stove. He shows in in use with a small pot. If you are using a larger pot, just make a larger stove with a 3 3/8 inch diameter aluminium cat food can.
____________________________________________

Monday, February 6, 2012

Ultralight: State of the Revolution

This is a 7-part article written by Ron Moak from Six Moon Designs. This is a thoughtful essay, looking at the history of “ultralight” camping, and all it’s implications.

Tuesday, January 31, 2012

Andrew Skurka update

Professional hiker and author

Andrew Skurka is now blogging. He is sharing his very detailed insights into trip planning and trail techniques. Of special interest to me was his food planning and how to print topo maps for a long hike.

His book is due out any day now. It's published by NATIONAL GEOGRAPHIC and it's loaded with color photographs. It's titled: The Ultimate Hiker’s Gear Guide: Tools & Techniques to Hit the Trail (linked to his site).

Thursday, January 5, 2012

hiking in Finland REVIEW

Don't they TELE ski in Finland?

Here's a super nice review of the book on an awesome site called HIKING IN FINLAND. I felt really honored to see this photo featured there.

Tuesday, January 3, 2012

igloos are easy!

The tent weight logs in at ZERO!

A nice instructional article on IGLOO CONSTRUCTION with a shout out to one of my other books. Sam and I have worked together and hiked together in the big mountains of the Northern Rockies. He is a seasoned ultra-light camper, and his blog is a must read.